Has your trampoline enclosure seen better days? If you’re noticing tears, fraying, or sagging in your trampoline net, it’s not just an eyesore—it’s a serious safety concern. ⚠️ As a trampoline owner, understanding when and how to approach trampoline net replacement is one of the most critical maintenance tasks you’ll face.
I’ve spent years researching and testing trampoline safety equipment, and I can tell you that the enclosure net is your first line of defense against injuries. In fact, according to the Consumer Product Safety Commission, properly maintained safety nets can reduce trampoline-related injuries by up to 50%. That’s why today, I’m sharing everything you need to know about trampoline net replacement to keep your backyard bouncing zone both fun and safe.
Whether you’re dealing with sun damage, winter wear, or just the natural aging of your trampoline enclosure, this comprehensive guide will walk you through the entire replacement process. From recognizing when it’s time for a new net to selecting the perfect replacement and installing it correctly, I’ve got you covered with expert advice and practical tips.
Why Trampoline Net Replacement Matters
The Critical Role of Trampoline Enclosure Nets
Your trampoline’s enclosure net isn’t just an accessory—it’s an essential safety feature that prevents jumpers from falling off the trampoline. When properly installed and maintained, a quality net creates a secure boundary that keeps everyone safely on the jumping surface.
The importance of trampoline net replacement cannot be overstated, as nets deteriorate over time due to:
✅ UV exposure causing material breakdown ✅ Harsh weather conditions including rain, snow, and wind ✅ Regular use creating stress on attachment points ✅ Natural aging of materials even with proper care
Signs You Need a Trampoline Net Replacement
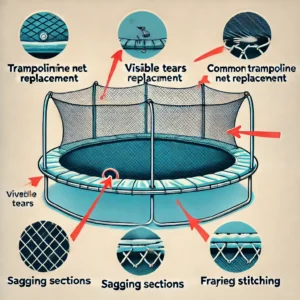
How do you know when it’s time to replace your trampoline enclosure? Look for these telltale indicators:
- Visible tears or holes – Even small rips can quickly become larger safety hazards
- Faded material – Significant color fading indicates UV damage and weakened fibers
- Sagging sections – A properly tensioned net should stand upright without significant drooping
- Frayed stitching – Particularly at stress points where the net attaches to poles
- Brittle or cracking material – Net material should remain flexible, not stiff or easily broken
- Rusted or damaged connectors – The hardware connecting your net may fail before the netting itself
- Age over 2 years – Even with no visible damage, most manufacturers recommend replacement every 2-3 years
I recently noticed my own trampoline net had developed small tears near the entrance. Though they seemed minor, I knew from experience that these weak points could rapidly expand during active jumping sessions. Trampoline net replacement immediately moved to the top of my maintenance list!
Types of Trampoline Nets and Replacement Options
Understanding Different Enclosure Systems
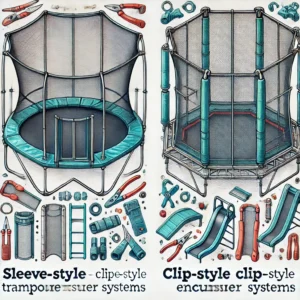
Before purchasing a trampoline net replacement, you need to understand what type of enclosure system your trampoline uses. The two main designs are:
1. Sleeve-Style Enclosures
- Net slides onto enclosure poles through sewn sleeves
- Generally considered more secure and stable
- Typically found on higher-end trampolines
- Often feature curved poles for added safety
2. Clip-Style Enclosures
- Net attaches to poles using clips, hooks, or straps
- Easier to install and replace
- More common on entry-level and mid-range trampolines
- Usually feature straight poles
Additionally, consider these key specifications when shopping for a trampoline net replacement:
- Mesh density – Tighter weave provides better durability
- UV protection – Special treatments extend net life
- Entry design – Zippered, overlapping, or buckle closures
- Height – Standard heights range from 5-6 feet
- Compatibility – Universal vs. brand-specific replacements
Universal vs. Brand-Specific Replacement Nets
When searching for a trampoline net replacement, you’ll encounter both universal options and brand-specific models. Each has advantages and limitations:
Universal Replacement Nets:
- Fit multiple trampoline sizes and brands
- Generally more affordable
- Readily available from multiple retailers
- May require more adjustments during installation
- Sometimes lack specialized features of original equipment
Brand-Specific Replacement Nets:
- Designed precisely for your trampoline model
- Preserve all original safety features
- Typically easier to install
- Often include exact hardware needed
- Usually more expensive than universal options
How to Measure for Trampoline Net Replacement
Before ordering your replacement net, accurate measurements are crucial. I learned this lesson the hard way when I once purchased a replacement that was too short, creating dangerous gaps at the bottom!
Essential Measurements to Take
Take these key measurements of your existing setup:
- Trampoline diameter – Measure across the center of the frame (not the mat)
- Number of enclosure poles – Count the total vertical supports
- Pole height – Measure from the frame to the top of each pole
- Distance between poles – Measure along the frame from center to center
- Net attachment style – Note whether your current net uses sleeves, clips, or another attachment method
Pro tip: Take photos of your current enclosure system from multiple angles before disassembly. These visual references will prove invaluable during installation of your trampoline net replacement.
Measuring Specialty Trampoline Shapes
For non-round trampolines, additional measurements are necessary:
Rectangle/Square Trampolines:
- Measure length and width of the frame
- Note corner designs (curved or 90-degrees)
- Measure height at corners and mid-points (if different)
Oval Trampolines:
- Measure the longest and widest points
- Count poles along both the straighter sides and curved ends
- Note any asymmetrical features in the enclosure design
Top 7 Trampoline Net Replacements Worth Your Investment
After extensive research and personal testing, I’ve identified the best trampoline net replacement options currently available. Here are my top recommendations for different needs and budgets:
Best Overall Trampoline Net Replacement
Upper Bounce Premium Trampoline Replacement Enclosure Safety Net stands out for its exceptional durability and universal fit. Its heavy-duty mesh construction resists UV damage while maintaining excellent visibility for parents supervising jumpers. The dual closure entry system provides an extra layer of security, and the reinforced stitching at stress points significantly extends its lifespan.
Best Budget-Friendly Option
For those watching their spending without compromising safety, the Skywalker Trampolines Safety Enclosure Net offers remarkable value. Compatible with most major brands, this replacement net features UV-resistant materials and a secure zipper closure. While not as heavy-duty as premium options, it provides reliable protection at an affordable price point.
Best for Premium Trampolines
If you’ve invested in a high-end trampoline, the JumpSport Safety Enclosure Net delivers premium protection worthy of your equipment. Its patented overlapping entry eliminates the vulnerability of traditional zippered openings, while its exceptionally fine mesh prevents finger entrapment—a thoughtful safety feature parents appreciate.
Best for Easy Installation
The SkyBound Trampoline Net Replacement earns top marks for user-friendly design. Its innovative quick-clip system simplifies the installation process, turning what could be a frustrating afternoon project into a straightforward task. Clear instructions and color-coded components further enhance the experience.
Best for Weather Resistance
Living in an area with extreme weather? The Jumpking Black Mesh Replacement Trampoline Net offers superior resilience against everything from scorching sun to heavy snow. Its specialized weather-resistant coating prevents premature deterioration, making it an excellent choice for trampolines without protective covers or storage options.
Best for Extra-Large Trampolines
Owners of oversized 15-16 foot trampolines should consider the Propel Trampolines Enclosure Safety Net. Specifically engineered for larger frames, it maintains proper tension across extended distances without sagging—a common problem with universal nets stretched to their limits.
Best for Specialty Shapes
If you own a rectangular or unusual trampoline shape, the ORCC Trampoline Replacement Safety Net offers adaptable designs for non-standard configurations. Their customer service will help ensure you get the correct size and shape for your specific trampoline model.
Comparison Table: Top Trampoline Net Replacements
| Product Name | Best For | UV Protection | Installation Difficulty | Entry Style | Price Range |
|---|---|---|---|---|---|
| Upper Bounce Premium | Overall Quality | Excellent | Medium | Dual Zipper | $$$$ |
| Skywalker Safety Net | Budget Option | Good | Easy | Single Zipper | $$ |
| JumpSport Safety Enclosure | Premium Trampolines | Excellent | Medium | Overlapping | $$$$$ |
| SkyBound Replacement | Easy Installation | Very Good | Very Easy | Zipper | $$$ |
| Jumpking Black Mesh | Weather Resistance | Excellent | Medium | Zipper | $$$ |
| Propel Enclosure Net | Extra-Large Sizes | Very Good | Difficult | Zipper | $$$$ |
| ORCC Replacement Net | Specialty Shapes | Good | Varies | Zipper | $$$$ |
Ready to secure your trampoline with a quality replacement net? Check out these top-rated options on Amazon today and give yourself peace of mind knowing your jumpers are protected!
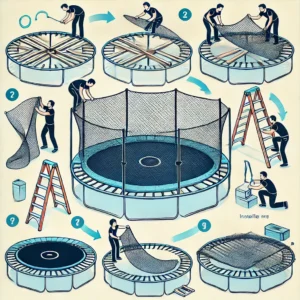
Step-by-Step Trampoline Net Replacement Guide
Preparation and Removal
Before installing your new trampoline net replacement, you’ll need to properly remove the old one:
- Gather necessary tools – Typically includes:
- Phillips and flathead screwdrivers
- Adjustable wrench
- Step ladder
- Work gloves (to protect hands from metal parts)
- Document the current setup – Take photos from multiple angles before disassembly
- Remove pole caps/toppers – These are often pressure-fitted and may require gentle prying
- Detach the net – Depending on your model:
- Unthread sleeves from poles
- Unclip attachment points
- Loosen tension straps
- Inspect poles and frame – While the net is removed, check for:
- Rust or corrosion
- Bent components
- Cracked plastic parts
- Missing hardware
- Clean components – Wipe down poles and connections before installing the new net
Installation Process
Now you’re ready to install your trampoline net replacement:
- Unpack and inspect the new net – Check for any manufacturing defects or shipping damage
- Identify the entry point – Position this at a convenient access location
- Start at the entry – Begin attachment opposite the entry point for most designs
- For sleeve-style nets:
- Slide poles through sleeves before attaching to the frame
- Secure bottom of net to the trampoline frame or mat
- Install top caps to secure the net in place
- For clip-style nets:
- Attach poles to the frame first
- Connect the net to poles using provided clips or straps
- Work systematically around the trampoline, maintaining even tension
- Secure the entry point – Ensure closures function properly and create a complete seal
- Final adjustments – Check for:
- Even tension throughout the net
- No gaps at bottom or between poles
- Secure attachment at all connection points
- Proper height clearance above the jumping surface
Common Installation Challenges
Having replaced numerous trampoline nets, I’ve encountered these frequent challenges:
Uneven Tension
- Solution: Loosen all connections, then gradually tighten them in a star pattern (similar to tightening lug nuts on a tire)
Sleeve Resistance
- Solution: Use a small amount of powder (like baby powder) inside sleeves to reduce friction when sliding poles through
Misaligned Pole Positions
- Solution: Number poles and frame connections before disassembly to ensure correct positioning
Short or Tight Netting
- Solution: Install on a warm day when materials are more flexible, or gently stretch net in sections before full installation

Extending the Life of Your Trampoline Net Replacement
Maintenance Best Practices
Once you’ve completed your trampoline net replacement, proper maintenance will maximize its lifespan:
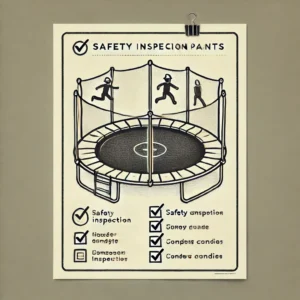
- Regular inspections – Check weekly during heavy use seasons for:
- New tears or holes
- Weakened stitching
- Loose connections
- UV damage signs
- Prompt repairs – Address minor damage immediately:
- Use heavy-duty outdoor thread for small tears
- Apply UV-resistant fabric patches for holes
- Tighten or replace loose hardware
- Cleaning routine – Maintain net integrity with:
- Gentle hosing to remove debris
- Soft brush for stubborn dirt
- Mild soap for significant grime (avoid harsh chemicals)
- Complete drying before heavy use
- Seasonal care – Protect during off-seasons:
- Remove in extreme winter climates
- Use a weather-resistant cover
- Reduce tension if leaving installed but unused
- Apply UV protectant spray annually
Weather Protection Tips
Environmental factors significantly impact trampoline net lifespan:
Sun Exposure ☀️
- Position trampoline to minimize direct afternoon sun if possible
- Consider shade options like nearby trees or shade sails
- Apply UV protectant spray designed for outdoor fabrics
Wind Protection
- Use wind stakes or anchors for the entire trampoline
- Remove net in extreme wind conditions if possible
- Ensure proper tension to prevent whipping or flapping
Rain and Moisture ️
- Ensure proper drainage beneath the trampoline
- Remove standing water promptly
- Allow complete drying after precipitation
Winter Care ❄️
- In severe winter regions, consider complete disassembly
- At minimum, remove and store the net indoors
- Use a winter cover designed for trampolines
- Clear snow promptly if leaving assembled
Trampoline Net Replacement FAQs
Common Questions Answered
How often should I replace my trampoline safety net? Most manufacturers recommend replacing enclosure nets every 2-3 years, even without visible damage. UV exposure and weather elements degrade the materials over time, compromising safety even when damage isn’t obvious.
Can I install a replacement net by myself? Yes, most trampoline net replacements can be installed by one person, though having a helper makes the process easier. Allow 1-2 hours for installation, and always follow the specific instructions provided with your replacement net.
Are universal replacement nets as safe as brand-specific ones? Universal nets can be equally safe when properly sized and installed. However, brand-specific replacements guarantee compatibility with your trampoline’s unique features and attachment systems. Either choice can be safe when quality products are selected.
What’s the best time of year to replace a trampoline net? Spring is ideal for trampoline net replacement, allowing you to address winter damage before the heavy use summer season. The moderate temperatures also make installation easier as materials are neither too stiff from cold nor too expanded from heat.
How much do quality replacement nets typically cost? Expect to spend between $70-$150 for a quality trampoline net replacement. While budget options exist below this range, they typically sacrifice durability and safety features. Premium nets for specialized or large trampolines may exceed $200.
Can I use my trampoline without an enclosure net? Using a trampoline without an intact enclosure net significantly increases injury risk and is strongly discouraged, especially for children. Many homeowner insurance policies also require proper safety enclosures for trampoline coverage.
What causes trampoline nets to deteriorate so quickly? UV radiation is the primary culprit in net deterioration, breaking down synthetic fibers over time. Combined with moisture, temperature fluctuations, and physical stress from use, these factors collectively reduce net integrity.
Safety Considerations Beyond Net Replacement
Creating a Complete Safety System
While trampoline net replacement is crucial, comprehensive safety involves additional elements:
- Impact protection – Ensure adequate padding covers:
- Springs or elastic bands
- Frame edges
- Pole bases
- Proper placement – Position your trampoline:
- On level ground
- Away from trees, fences, and structures
- On energy-absorbing surfaces (grass rather than concrete)
- With adequate clearance on all sides
- Usage rules – Establish and enforce:
- One jumper at a time policy
- No somersaults without proper training
- No jumping onto or off the trampoline
- Adult supervision for children
- Regular inspections – Check frequently for:
- Mat tears or weakness
- Spring damage or disconnection
- Frame bending or damage
- Proper leg support and stability
When to Replace Other Components
Trampoline safety depends on more than just the enclosure net. Consider these replacement guidelines for other components:
Jump Mat: Replace every 3-5 years, or when you notice:
- Significant fading
- Tears or holes
- Stretched or weakened bounce
- Visible thread deterioration
Spring Padding: Replace every 2-3 years, or when:
- Foam becomes compressed or brittle
- Covering tears or separates
- Attachment methods fail
- UV damage causes crumbling
Springs: Replace as needed when you find:
- Stretched or deformed coils
- Rust or corrosion
- Breakage or cracks
- Reduced bounce performance
I recently discovered during my trampoline net replacement that my spring padding had deteriorated significantly. Rather than addressing just one component, I opted to replace both simultaneously—a decision that saved installation time and ensured consistent protection levels.
Conclusion
Trampoline net replacement is a crucial maintenance task that directly impacts the safety of everyone who uses your trampoline. By understanding when replacement is necessary, selecting the right type of enclosure, and following proper installation procedures, you’re making a significant investment in backyard safety.
Remember that even the highest quality nets require regular inspection and eventual replacement. The joy of worry-free bouncing makes this maintenance well worth the effort and expense. Whether you choose a universal replacement or a brand-specific option, prioritize quality materials and proper fit above all other considerations.
Have you recently replaced your trampoline net or have questions about the process? I’d love to hear about your experience in the comments below! And don’t forget to share this guide with fellow trampoline owners who might benefit from these safety tips.
Ready to upgrade your trampoline’s safety system? The replacement nets featured in this guide offer excellent protection at various price points. Click through to find the perfect match for your trampoline and enjoy peace of mind all season long!
More FQAs:
❓ How do I measure my trampoline to ensure I purchase the correct replacement net?
✅ Measure the trampoline's frame diameter from outer edge to outer edge at both the 3-to-9 o'clock and 12-to-6 o'clock positions to determine the correct size...
❓ What are the different types of trampoline enclosure systems?
✅ Trampoline enclosures typically come in sleeve-style, where the net slides onto poles, and clip-style, attaching via clips or straps. Identifying your system ensures compatibility with replacement nets...
❓ How can I tell if my trampoline's safety net needs replacement?
✅ Signs include visible tears or holes, significant fading from UV exposure, sagging sections, frayed stitching, brittle material, rusted connectors, or if the net is over 2 years old...
❓ Are universal replacement nets suitable for all trampolines?
✅ Universal nets fit various trampoline sizes and brands but may require adjustments during installation. Brand-specific nets ensure a precise fit and maintain original safety features...
❓ How should I maintain my trampoline's safety net to prolong its lifespan?
✅ Regularly inspect for damage, clean with mild soap and water, remove the net during severe weather, and store it indoors during off-seasons to prevent wear and tear...
Recommended for You:
- Trampoline 14 Foot: 7 Powerful Benefits for Epic Family Fitness
- Nova Trampoline: 7 Incredible Ways to Revolutionize Family Fitness Today!
- The Ultimate Guide to 10 Foot Trampolines: Unleash Backyard Fun Today!
Disclaimer: This article contains affiliate links. If you purchase products through these links, we may earn a small commission at no additional cost to you.