When I first brought my daughter home from the hospital, I spent hours researching every safety detail for her nursery. The crib? Check. The changing table? Secured to the wall. But then I stared at the ceiling, wondering exactly where that smoke detector should go. Turns out, proper smoke detectors placement in nursery spaces isn’t just about slapping one up anywhere—it’s a science that could save your baby’s life.
✨Was this helpful? Spread the word!
Here’s something that’ll wake you up faster than a 3 AM feeding: according to the National Fire Protection Association, three out of five fire deaths happen in homes without working smoke alarms. Even more sobering? Young children and infants are at higher risk because they sleep more deeply and can’t evacuate on their own. That’s why understanding smoke detectors placement in nursery rooms isn’t just recommended—it’s essential.
Quick Comparison: Nursery Smoke Detector Options
| Detector Type | Best For | Installation | Price Range | Key Feature |
|---|---|---|---|---|
| Battery-Powered | Rental homes, easy setup | DIY friendly | $15-$50 | Portable, no wiring |
| Hardwired | New construction, permanent | Professional recommended | $30-$80 | Power backup |
| Smart/WiFi | Tech-savvy parents | Moderate DIY | $80-$150 | Phone alerts |
| Combination Smoke+CO | Complete protection | Varies | $40-$130 | Dual detection |
| Interconnected | Multi-room coverage | Professional for hardwired | $25-$120 | Whole-home alert |
Top 7 Smoke Detectors for Nursery: Expert Analysis
After researching dozens of models and consulting safety standards, I’ve identified seven outstanding options for smoke detectors placement in nursery environments. Each has been vetted for reliability, ease of use, and specific nursery applications.
1. X-Sense SC01 10-Year Battery Combo Detector
This powerhouse combines smoke and carbon monoxide detection in one sleek unit that’s perfect for nursery use. The X-Sense SC01 features a large LCD display showing real-time CO levels, which is especially valuable since infants are more vulnerable to carbon monoxide poisoning than adults.
Key Specifications:
- ✅ 10-year sealed lithium battery (no midnight battery changes!)
- ✅ Dual photoelectric smoke + electrochemical CO sensor
- ✅ LCD display with backlight for nighttime checks
- ✅ 85-decibel alarm
- ✅ Test/silence button
- ✅ Battery operated (no wiring required)
Pros:
- Excellent value for dual protection
- Set-it-and-forget-it 10-year battery
- Clear display shows CO levels 30-999 ppm
- Easy installation with included mounting hardware
Cons:
- No interconnectivity with other alarms
- Display light might bother light-sensitive babies (though it auto-dims)
The SC01 is ideal for parents who want comprehensive protection without the hassle of hardwiring. Customer reviews consistently praise its reliability and the peace of mind from seeing real-time CO readings.
2. First Alert SC5 Battery Smart Smoke & CO Alarm
For tech-forward parents who want to monitor their nursery from anywhere, the First Alert SC5 delivers premium smart features. This detector works seamlessly with the First Alert app and is compatible with Google Nest Protect systems.
Key Specifications:
- ✅ WiFi-enabled with smartphone alerts
- ✅ Voice alerts with location announcement
- ✅ Wireless interconnect capability
- ✅ Precision Detection technology (reduces cooking false alarms)
- ✅ Battery-powered with low-battery notifications via app
- ✅ Works with First Alert and Google Nest Protect alarms
Pros:
- Receive instant alerts on your phone when alarm triggers
- Voice announces location (“Smoke detected in nursery”)
- Can interconnect with up to 18 compatible devices
- App lets you silence false alarms remotely
- Advanced sensing reduces nuisance alarms
Cons:
- Higher price point
- Requires stable WiFi connection
- Batteries need annual replacement
Parents love this for its connectivity—you’ll know immediately if there’s a problem in the nursery, even if you’re at work or running errands.
3. Kidde 20SA10 Hardwired Smoke Detector
If you’re building or renovating, the Kidde 20SA10 offers rock-solid hardwired protection with a 10-year backup battery. This model is specifically designed to meet the latest UL 217 standards for reducing nuisance alarms.
Key Specifications:
- ✅ 120V AC hardwired with 10-year lithium battery backup
- ✅ Photoelectric sensor technology
- ✅ Interconnectable (up to 12 smoke alarms + 6 devices)
- ✅ 85-decibel alarm with LED indicators
- ✅ Green/amber/red status lights
- ✅ Enhanced sensing reduces cooking false alarms
- ✅ 5-inch modern design
Pros:
- Continuous power from home electrical system
- 10-year backup battery (no mid-night chirping for years)
- When one sounds, all interconnected alarms sound
- LED lights provide visual status confirmation
- UL-certified for latest safety standards
Cons:
- Requires professional installation if you don’t have existing wiring
- Not portable
The 20SA10 is perfect for permanent installations where you want reliability and whole-home coverage. The interconnect feature means if smoke is detected anywhere, every alarm sounds—critical when a nursery is on a different floor from master bedrooms.
4. X-Sense XS01-WX Smart WiFi Smoke Detector
The X-Sense XS01-WX brings affordability to the smart detector category, offering app notifications and remote testing without breaking the bank. It’s an excellent choice for smoke detectors placement in nursery rooms where you want smart features on a budget.
Key Specifications:
- ✅ WiFi-enabled (2.4 GHz) with real-time app notifications
- ✅ Photoelectric sensor for smoldering fire detection
- ✅ Replaceable CR123A battery (5-year life)
- ✅ 10-year sensor lifespan
- ✅ 85-decibel alarm
- ✅ Remote testing via X-Sense Home Security app
- ✅ Optional 24/7 professional monitoring (Protect+ subscription)
Pros:
- More affordable than premium smart detectors
- Direct WiFi connection (no hub required)
- Test from your phone—no ladder needed
- Fast fire dispatch option with subscription
- Share device access with up to 12 family members
Cons:
- Battery needs replacement every 5 years
- Only works with 2.4 GHz WiFi
- Devices don’t interconnect with each other
This is my top recommendation for parents who want smart features without the Nest Protect price tag. The ability to test it from your phone is especially handy when you don’t want to wake a sleeping baby by climbing a ladder.
5. First Alert SMCO500V Interconnect Battery Combo with Voice
The First Alert SMCO500V combines voice alerts with wireless interconnect capability—a game-changer for multi-story homes with nurseries far from parent bedrooms.
Key Specifications:
- ✅ Battery-operated smoke + CO combo
- ✅ Voice and location alerts (11 pre-programmed locations)
- ✅ Wireless interconnect (up to 12 alarms + 6 devices)
- ✅ Precision Detection technology
- ✅ Photoelectric smoke sensor + electrochemical CO sensor
- ✅ Test/silence button with latching alarm indicator
- ✅ End-of-life warning
Pros:
- Voice alerts tell you exactly where danger is (“Smoke in nursery!”)
- Wireless interconnect without hardwiring
- Easy to program custom location names
- Advanced sensing reduces false alarms
- Battery-powered for flexible placement
Cons:
- Batteries require replacement
- More expensive than basic models
- Takes setup time to program locations
Parents rave about the voice alerts—instead of a generic beep, you hear exactly what’s happening and where. This is invaluable when you’re groggy at night and need to make quick evacuation decisions.
6. First Alert BRK 9120BFF Hardwired Smoke Detector
A proven workhorse in the fire safety world, the First Alert 9120BFF (also sold as BRK SMI100-AC) offers reliable hardwired protection with ionization sensing technology that excels at detecting fast-flaming fires.
Key Specifications:
- ✅ 120V AC hardwired with 9V battery backup
- ✅ Ionization sensor (detects fast-flaming fires)
- ✅ Interconnectable (up to 12 alarms + 6 devices)
- ✅ 85-decibel alarm
- ✅ Tamper-resistant locking brackets
- ✅ Single test/silence button
- ✅ Power indicator shows which unit triggered alarm
Pros:
- Ionization technology complements photoelectric sensors
- Proven reliability (millions in use)
- Interconnect capability for whole-home protection
- Battery backup ensures function during outages
- Easy to install in existing hardwired mounts
Cons:
- More prone to cooking false alarms than photoelectric
- Requires annual battery replacement
- Professional installation recommended
Industry experts recommend using both ionization and photoelectric detectors for comprehensive coverage. The 9120BFF is ideal for hallways outside nursery doors where fast-flaming fire detection is critical.
7. Kidde 30CUD10 10-Year Combo with Display
The Kidde 30CUD10 rounds out our list with cutting-edge features including a digital display, 10-year battery, and dual sensor protection—all in a battery-powered package perfect for nursery use.
Key Specifications:
- ✅ 10-year sealed lithium battery
- ✅ Smoke + CO combination protection
- ✅ Digital display shows CO levels and battery status
- ✅ Photoelectric smoke sensor
- ✅ Electrochemical CO sensor
- ✅ 85-decibel alarm
- ✅ Test/silence button
- ✅ Modern slim profile design
Pros:
- No battery changes for entire 10-year lifespan
- Digital display provides real-time information
- Comprehensive dual protection
- Battery-powered for easy placement
- UL-certified to latest standards
Cons:
- Higher upfront cost
- Not interconnectable
- No smart/WiFi features
This is an excellent middle-ground option—more features than basic models but without the complexity of smart systems. The 10-year battery is particularly appealing for busy parents who don’t want another maintenance task.
Ready to Protect Your Nursery?
✨ Don’t wait to secure your baby’s safety! Each of these carefully selected detectors offers proven protection that could save your family’s life. Click on any product name above to check current availability and read verified customer reviews. Your peace of mind is just one click away!
Just one click – help others make better buying decisions too!
Understanding Smoke Detectors Placement in Nursery: The Science Behind Safety
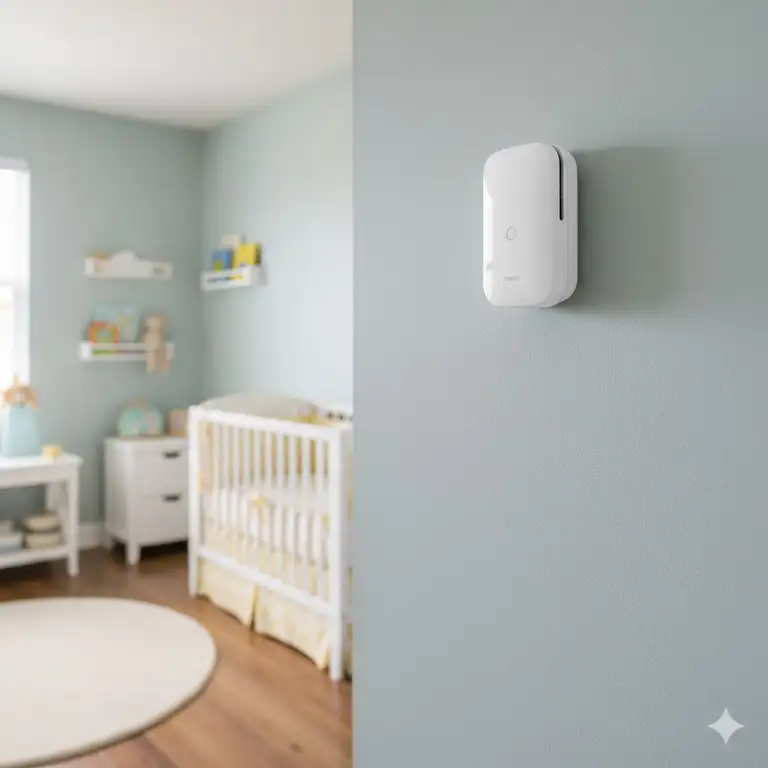
Let’s talk about why location matters so much. Smoke and heat behave predictably during fires—they rise and spread horizontally across ceilings. Proper smoke detectors placement in nursery spaces takes advantage of this physics to give you the earliest possible warning.
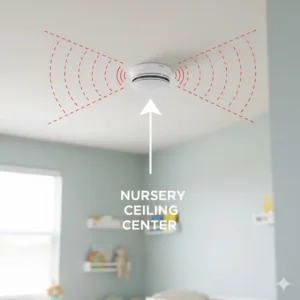
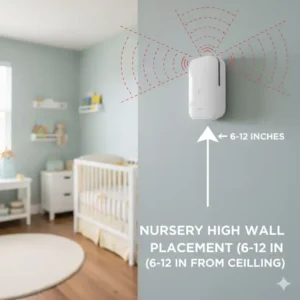
The Ceiling vs. Wall Debate
Ceiling mounting is preferred for smoke detector placement in nursery rooms because smoke naturally rises. Position your detector:
✅ At least 4 inches away from walls (where “dead air” can prevent smoke from reaching sensors)
✅ In the center of the room for maximum coverage
✅ Within 3 inches of a peaked ceiling’s highest point
However, wall mounting works when ceiling installation isn’t feasible. Follow these rules:
✅ Mount with the top of the detector 4-12 inches below the ceiling
✅ Avoid corners where air circulation is poor
✅ Stay away from windows, doors, and HVAC vents
Critical Placement Guidelines for Nursery Rooms
The NFPA provides specific recommendations that every parent should follow for smoke detectors placement in nursery spaces:
MUST-HAVE LOCATIONS:
- Inside the nursery – This is non-negotiable. Your baby’s room needs its own detector.
- Outside the nursery in the hallway – Place within 21 feet of the nursery door (10-15 feet is optimal).
- On every level of your home – Including basements where furnaces and water heaters lurk.
- In every other bedroom – Parents’ rooms, siblings’ rooms, guest rooms.
❌ AVOID THESE SPOTS:
- Within 10 feet of cooking appliances (reduces false alarms from kitchen steam)
- Near bathroom doors (shower steam triggers false alarms)
- Close to heating/cooling vents or ceiling fans (airflow disrupts smoke detection)
- In garages (exhaust fumes cause nuisance alarms; use heat detectors instead)
- Direct corners where air doesn’t circulate
Special Considerations for Baby Nurseries
Nurseries present unique challenges for smoke detector placement in nursery settings. Consider these factors:
️ Temperature and Humidity: Humidifiers are common in nurseries but high humidity can trigger false alarms. Keep detectors at least 3-5 feet from humidifiers and ensure proper ventilation.
Sound Considerations: Babies have developing hearing, but safety trumps sleep concerns. Modern detectors with voice alerts can be less startling than traditional piercing alarms while still being effective.
Monitoring While Away: Smart detectors are especially valuable in nurseries because you’re alerted even when using a baby monitor on another floor or when away from home.
Interconnectivity Is King: When the nursery alarm sounds, you want EVERY alarm in your home to sound. Interconnected systems ensure parents hear warnings no matter where they are in the house.
Detector Types: Choosing the Right Technology
Understanding detector types helps optimize smoke detectors placement in nursery rooms and throughout your home.
Ionization vs. Photoelectric: The Great Debate
| Feature | Ionization Detectors | Photoelectric Detectors |
|---|---|---|
| Best Detects | Fast-flaming fires | Slow-smoldering fires |
| Response Speed | Faster to flames | Faster to smoke |
| False Alarms | More from cooking | Fewer cooking alarms |
| Technology | Radioactive material | Light beam |
| Nursery Use | Hallways outside | Inside nursery |
| Cost | Generally lower | Slightly higher |
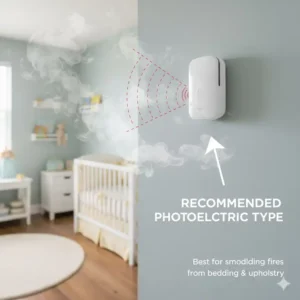
Pro Tip: Fire safety experts, including the U.S. Consumer Product Safety Commission, recommend using BOTH types in your home. Place photoelectric models inside the nursery (less prone to false alarms from diaper pails or air fresheners) and ionization models in hallways outside.
Single Sensor vs. Dual Sensor vs. Combination Alarms
Single Sensor detectors use only ionization OR photoelectric technology. They’re cheaper but provide limited protection.
Dual Sensor detectors combine both ionization and photoelectric sensors in one unit, offering comprehensive smoke detection. These are excellent for smoke detectors placement in nursery areas.
Combination Alarms detect both smoke AND carbon monoxide. Given that CO is odorless, colorless, and especially dangerous to infants, combination alarms are increasingly popular for nurseries.
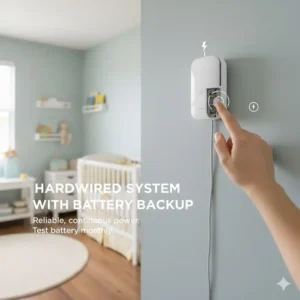
Battery vs. Hardwired vs. Smart: Power Options
| Power Type | Advantages | Disadvantages | Best For |
|---|---|---|---|
| Battery-Powered | Easy DIY installation, portable, works during power outages | Regular battery replacement, can be disabled if battery dies | Rentals, quick setup, supplemental coverage |
| Hardwired (AC) | Continuous power, no battery changes (with sealed battery backup), interconnectable | Professional installation, not portable | New construction, permanent homes, whole-home systems |
| Smart/WiFi | Phone alerts, remote testing, status monitoring, voice alerts | Higher cost, requires WiFi, battery or hardwired | Tech-savvy parents, multi-level homes, frequent travelers |
| 10-Year Sealed Battery | No battery changes for 10 years, reliable | Entire unit replacement after 10 years | Low-maintenance solution, forgetful homeowners |
Step-by-Step: Perfect Smoke Detectors Placement in Nursery Rooms
Let me walk you through the exact process I used when setting up smoke detectors placement in nursery spaces for my own daughter’s room.
Phase 1: Assessment (Before You Buy)
Step 1: Measure your nursery. Draw a simple floor plan noting:
- Door locations and swing direction
- Window positions
- Ceiling height and any slopes
- HVAC vent locations
- Humidifier placement
- Distance to kitchen and bathrooms
Step 2: Determine your home’s wiring. Do you have existing hardwired detectors? Can you connect to them? If renting, battery-powered is likely your only option.
Step 3: Count how many detectors you need:
- One FOR the nursery
- One OUTSIDE the nursery (hallway)
- One per additional floor
- One per other bedroom
Phase 2: Installation (The Right Way)
For Ceiling-Mounted Detectors:
- Mark the spot 4+ inches from any wall, ideally near room center
- Avoid obstacles: Keep 3 feet from ceiling fans, 10 feet from cooking appliances
- Check for studs (use a stud finder if available)
- Install mounting bracket using included screws
- Attach detector with a twist-and-lock motion
- Test immediately using the test button
For Wall-Mounted Detectors:
- Measure 4-12 inches down from ceiling
- Mark level using a level tool
- Install bracket ensuring it’s perfectly level
- Mount detector and twist to lock
- Test before leaving the room
Phase 3: Interconnection (If Applicable)
Hardwired interconnection requires professional installation, but wireless systems are DIY-friendly:
- Install all detectors following manufacturer instructions
- Enter pairing mode on first detector
- Follow app or button sequence to link detectors
- Test interconnection by triggering one detector—all should sound
- Program location names (if voice-alert capable)
Phase 4: Smart Setup (WiFi Detectors)
- Download the manufacturer’s app (First Alert, X-Sense, etc.)
- Create an account and follow onboarding
- Scan QR code on detector or follow pairing process
- Connect to 2.4 GHz WiFi (most don’t support 5 GHz)
- Test notifications by triggering test mode
- Share access with partner, grandparents, or babysitters
- Set notification preferences for different alert types

Maintenance: Keeping Your System Reliable
Here’s the truth nobody wants to hear: installing smoke detectors placement in nursery spaces is just the beginning. Maintenance determines whether they’ll actually work when needed.
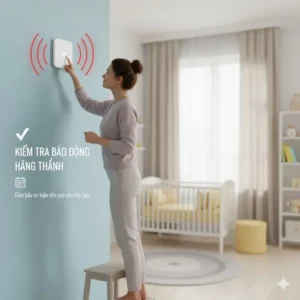
Monthly Tasks (5 Minutes)
✅ Press the test button on every detector
✅ Listen for the full alarm sound (not just a chirp)
✅ Check LED lights are functioning
✅ Dust or vacuum the detector’s exterior vents
✅ Verify smart app connectivity (for WiFi models)
Every 6 Months (15 Minutes)
✅ Replace batteries in non-sealed battery models (tie it to daylight saving time changes)
✅ Deep clean with compressed air or vacuum attachment
✅ Check mounting brackets are secure
✅ Test interconnectivity (if applicable)
✅ Update firmware on smart detectors
Annual Tasks (30 Minutes)
✅ Test with actual smoke using smoke detector testing spray (available at hardware stores)
✅ Inspect wiring on hardwired models for damage or corrosion
✅ Review user manuals for specific maintenance requirements
✅ Check expiration dates (most sensors last 10 years from manufacture)
✅ Test all smart features including phone alerts and voice announcements
10-Year Replacement
This is critical: Replace all smoke detectors every 10 years regardless of how well they seem to work. Sensors degrade over time, even if the alarm still sounds during tests.
Mark the installation date on each detector with a permanent marker. Set a calendar reminder for replacement.
Common Mistakes to Avoid
I’ve consulted with fire safety professionals and compiled the most common errors in smoke detectors placement in nursery installations:
❌ Mistake #1: Thinking One Detector Is Enough
Reality: Every sleeping room needs its own detector. The hallway detector won’t wake a baby quickly enough if smoke originates in the nursery.
❌ Mistake #2: Painting Over Detectors
Reality: Paint clogs the smoke sensor openings. Never paint detectors, even if they clash with your carefully chosen nursery color scheme.
❌ Mistake #3: Installing Only Battery-Powered When Hardwired Is Possible
Reality: While battery-powered detectors work, hardwired systems with interconnectivity provide superior protection and eliminate the risk of dead batteries.
❌ Mistake #4: Forgetting About Carbon Monoxide
Reality: CO detectors are just as important as smoke detectors, especially in homes with fuel-burning appliances. Infants are particularly vulnerable to CO poisoning.
❌ Mistake #5: Disabling Detectors Due to False Alarms
Reality: If you’re getting false alarms, the detector may be poorly placed (too close to kitchen or bathroom) or needs replacement. Never disable a detector—relocate it instead.
❌ Mistake #6: Not Testing Interconnection
Reality: You bought interconnected alarms but never verified they actually communicate. Test this monthly.
❌ Mistake #7: Ignoring Smart Features
Reality: You have a smart detector but haven’t set up the app. Those phone alerts are useless if the app isn’t configured.
Advanced Strategies for Complete Nursery Protection
Creating a Comprehensive Safety Ecosystem
Smoke detectors are just one component of nursery fire safety. Here’s how to build a complete system:
Layer 1: Detection
- Smoke detectors (as discussed)
- CO detectors in every sleeping area
- Heat detectors in garage (if attached)
- Smart water leak detectors near nursery
Layer 2: Suppression
- Fire extinguisher rated for all fire types (ABC) on every floor
- Fire blanket in kitchen
- Automatic fire sprinklers (if building new)
Layer 3: Escape
- Two escape routes from nursery identified
- Escape ladder for upper-floor nurseries
- Emergency lighting (flashlights charged and accessible)
- Family evacuation plan practiced quarterly
Layer 4: Communication
- Phone tree for emergencies
- Neighbor awareness of young children in home
- 911 fast-dial programmed into phones
- Smart home integration (lights flash when alarm sounds)
Integration with Smart Home Systems
Modern smoke detectors can integrate with smart home ecosystems for enhanced safety:
Amazon Alexa Integration:
- “Alexa, test nursery smoke detector”
- Automatic announcements when alarms trigger
- Light integration (all lights turn on during alarm)
- Door unlocking for emergency responders
Google Home Integration:
- Voice control for compatible detectors
- Routines that activate when smoke detected
- Nest Protect integration with Nest cameras
- Emergency contact notifications
Apple HomeKit Integration:
- Siri shortcuts for testing and status checks
- Automation based on detector status
- Integration with HomePod for announcements
- Remote monitoring via Home app
Real-World Scenarios: When Placement Matters Most
Let me share three scenarios that illustrate why proper smoke detectors placement in nursery rooms is so critical.
Scenario 1: The Middle-of-the-Night Fire
It’s 2 AM. A electrical short in the hallway outlet ignites insulation behind the wall. Because you followed NFPA guidelines and installed interconnected detectors inside AND outside the nursery, every alarm in your home sounds simultaneously. You’re alerted immediately even though the fire isn’t in the nursery yet. You have time to grab your baby and evacuate safely.
Without proper placement: A single detector far from the nursery might not sound until smoke spreads significantly. Those extra minutes could be deadly.
Scenario 2: The False Alarm Problem
You’re exhausted. The smoke detector in the hallway keeps going off because it’s too close to the bathroom and registers shower steam as smoke. In frustration, you remove the battery “temporarily”—but forget to replace it. Weeks later, a real fire breaks out.
With proper placement: A photoelectric detector properly positioned 10+ feet from the bathroom door won’t trigger false alarms, so you’ll never be tempted to disable it.
Scenario 3: The Out-of-Town Emergency
You’re visiting family out of state while your partner works late. A kitchen fire starts while your partner is in the basement doing laundry. Thanks to your smart detector’s phone alerts, you receive notification instantly and can call 911 from across the country while also calling your partner. Both alarms and phone alerts ensure the fastest possible response.
Without smart features: Your partner might not hear the alarm in the basement immediately, losing precious evacuation time.
Budget Planning: Cost Analysis
| Solution Type | Initial Cost | Annual Cost | 10-Year Total | Best For |
|---|---|---|---|---|
| Basic Battery (per detector) | $15-$30 | $10 (batteries) | $115-$130 | Tight budgets |
| 10-Year Sealed Battery | $40-$60 | $0 | $40-$60 | Low maintenance |
| Hardwired Professional | $100-$200 (installed) | $5 (backup battery) | $150-$250 | New construction |
| Smart WiFi System (4 detectors) | $320-$600 | $20 (batteries) | $520-$800 | Tech integration |
| Complete Professional System | $500-$1,500 | $50-$100 | $1,000-$2,500 | Maximum protection |
Money-Saving Tips:
- Buy multi-packs (usually 10-20% cheaper per unit)
- Watch for Black Friday and Prime Day sales
- Check homeowner’s insurance for discounts (some offer 5-10% off for interconnected systems)
- DIY battery-powered installation saves $50-$100 per detector
- Look for manufacturer rebates (especially on smart models)
Legal Requirements: What Your State Mandates
Smoke detector laws vary by state and even by municipality. As of 2025, here are general requirements that affect smoke detectors placement in nursery settings:
Federal Baseline (applies to all states):
- One detector per sleeping room
- One outside each sleeping area
- One on every level including basement
- Interconnected in new construction
State-Specific Variations:
Some states require:
- 10-year sealed batteries in all detectors
- Combination smoke+CO alarms in specific locations
- Hardwired with battery backup in new construction
- Professional installation certification
Rental Property Requirements:
Landlords typically must:
- Provide working detectors at move-in
- Ensure proper placement per local codes
- Replace batteries or units as needed
- Respond to detector complaints within 48 hours
Action Item: Check with your local fire marshal’s office or visit FEMA’s U.S. Fire Administration website for specific requirements in your jurisdiction.
Beyond Smoke: Complete Nursery Fire Safety
While this guide focuses on smoke detectors placement in nursery rooms, comprehensive fire safety requires multiple strategies:
Fire Prevention Measures
Electrical Safety:
- ✅ Never overload outlets (nurseries have multiple devices)
- ✅ Check cords regularly for fraying
- ✅ Keep night lights away from curtains and bedding
- ✅ Use surge protectors for all electronics
- ✅ Install tamper-resistant outlet covers
Heating Safety:
- ✅ Keep space heaters 3+ feet from cribs, curtains, and rugs
- ✅ Never use extension cords with heaters
- ✅ Turn off heaters when leaving room
- ✅ Consider safer alternatives like radiant heat panels
Storage Safety:
- ✅ Store flammable items (diaper cream, alcohol-based sanitizers) away from heat sources
- ✅ Keep matches and lighters locked away
- ✅ Organize to prevent clutter buildup
Evacuation Planning
Develop a written plan:
- Primary exit route from nursery
- Secondary exit route (window?)
- Meeting place outside (specific location)
- Who grabs the baby
- Backup plan if primary parent isn’t home
Practice quarterly:
- Run full drills, including middle of night
- Time your evacuation (goal: under 2 minutes)
- Practice with whoever cares for baby (grandparents, nanny, etc.)
- Update plan as baby grows and mobility changes
Essential Equipment:
- Emergency ladder for upper-floor nurseries
- Grab-and-go bag with essentials
- Phone charger in evacuation bag
- Recent photo of baby for emergency responders
️ Take Action Today – Your Baby’s Safety Depends On It
Time to stop reading and start protecting! You now have the knowledge to properly install smoke detectors placement in nursery spaces. Click on any of the recommended products above to get started. Remember: the best smoke detector is the one that’s installed and working. Don’t wait for “the perfect time”—order today and install this weekend. Your baby’s safety is worth every minute and dollar invested.
Conclusion
Getting smoke detectors placement in nursery rooms right isn’t complicated—it just requires following proven guidelines and choosing quality equipment. Install detectors inside the nursery and in the hallway outside, use interconnected systems when possible, and maintain them religiously. Combine photoelectric and ionization technologies, consider smart features for added convenience, and never disable a detector due to false alarms.
Your baby depends on you for protection, and proper smoke detector installation is one of the most important safety measures you’ll take. Yes, it requires some upfront investment and ongoing maintenance, but what price can you put on your child’s life? Fire moves fast—give yourself every possible second to evacuate safely.
Take action today. Assess your current setup, order the detectors you need, and install them properly. Test monthly, maintain regularly, and replace every 10 years. Create and practice an evacuation plan. Build a comprehensive fire safety system that includes detection, suppression, and escape strategies.
Sleep better knowing you’ve done everything possible to protect your precious baby from fire’s devastating effects. That’s the real value of proper smoke detectors placement in nursery spaces—not just compliance with codes, but genuine peace of mind that comes from being fully prepared.
FAQs
✅ Mount smoke detectors on the ceiling at least 4 inches from any wall, or on walls 4-12 inches below the ceiling. Keep them away from HVAC vents, windows, and doors. Place at least 10 feet from humidifiers to avoid false alarms from steam. Ceiling center provides optimal coverage for typical nursery rooms...
✅ No, you need separate detectors inside each bedroom and in hallways outside sleeping areas. Each bedroom requires its own detector because closed doors prevent early smoke detection. A hallway detector alone won't alert you fast enough if fire starts inside the nursery. Interconnected alarms ensure all units sound together for maximum warning time...
✅ Photoelectric smoke detectors work best in nurseries with humidifiers because they're less sensitive to moisture and steam compared to ionization models. Position detectors at least 10 feet from humidifiers and 3 feet from ceiling fans. Smart models with humidity sensors like the Kidde Smart Detector can distinguish between steam and actual smoke...
✅ Hardwired smoke detectors with 10 year battery backup offer superior reliability for permanent installations and allow interconnection with whole house alarm systems. Battery powered units work well for rentals or temporary nursery setups. Choose 10 year sealed lithium battery models to eliminate middle of night battery replacement chirps that disturb sleeping babies...
✅ Smart smoke detectors provide crucial advantages for nursery protection including instant phone alerts when you're away from home, remote testing without disturbing sleeping babies, and voice location announcements that specify which room has danger. Models like First Alert SC5 and X-Sense XS01-WX let you monitor nursery safety from anywhere through dedicated mobile apps... ❓ Where exactly should I mount a smoke detector in my baby's nursery?
❓ Can I use just one smoke detector for my entire upstairs if the nursery is there?
❓ What type of smoke detector works best for nurseries with humidifiers?
❓ Should I choose hardwired or battery powered smoke detectors for a nursery?
❓ Do smart smoke detectors really help protect nurseries better than regular ones?
Recommended for You
- Keeping Bathroom Cleaning Supplies Locked Up: 7 Life-Saving Solutions Every Parent Should Know
- Anti Scald Device for Bathroom Faucets: 7 Best Picks 2025
- Non Toxic Baby Gates for Wide Openings: 7 Best Picks
Disclaimer: This article contains affiliate links. If you purchase products through these links, we may earn a small commission at no additional cost to you.
✨ Found this helpful? Share it with your friends!