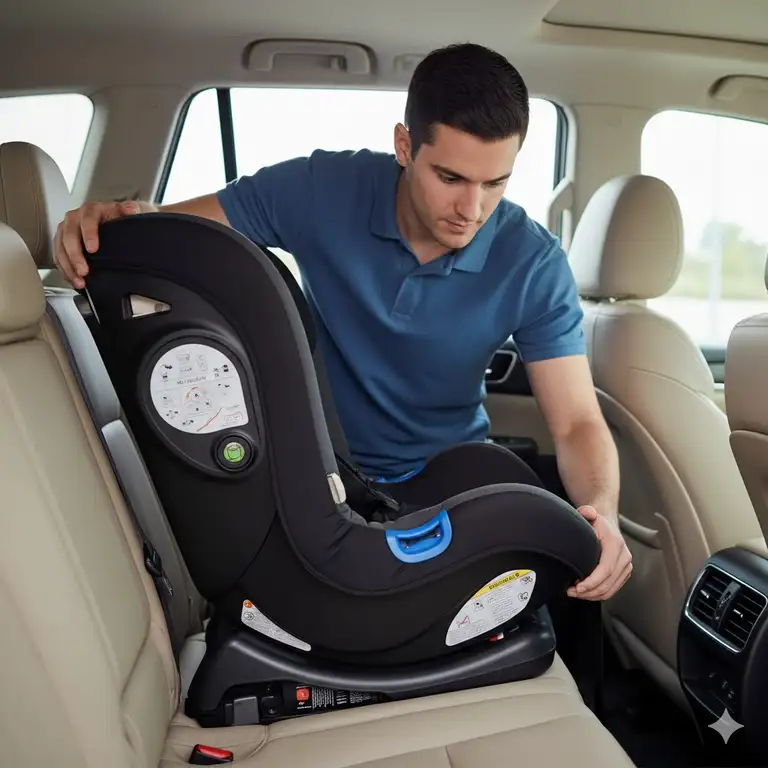
You know that moment when you bring your newborn home from the hospital? Your heart is racing, your palms are sweating, and you’re staring at this confusing contraption called a car seat wondering if you’re doing it right. I’ve been there. Trust me, you’re not alone in feeling completely overwhelmed by child safety seat installation tips.
✨Was this helpful? Spread the word!
[addtoany]Here’s a sobering fact that should grab your attention: according to the National Highway Traffic Safety Administration, nearly 46% of car seats are misused in ways that could reduce their effectiveness. That’s almost half of all installations. But here’s the good news—once you understand the proper child safety seat installation tips, the process becomes second nature.
Moreover, studies show that correctly installed car seats reduce the risk of injury by up to 82%. That’s not just a statistic; that’s your child’s life we’re talking about. So let’s dive into everything you need to know about child safety seat installation tips, from choosing the right seat to mastering the installation process.
Quick Comparison: Installation Methods Overview
| Installation Method | Difficulty Level | Best For | Time Required | Safety Rating |
|---|---|---|---|---|
| LATCH System | Easy | Most modern vehicles | 10-15 minutes | ⭐⭐⭐⭐⭐ |
| Seat Belt Installation | Moderate | Older vehicles, heavy children | 15-20 minutes | ⭐⭐⭐⭐⭐ |
| Base + Carrier System | Easy | Infant seats | 20 minutes initial | ⭐⭐⭐⭐⭐ |
| Rotating Convertible | Moderate | Growing families | 25-30 minutes | ⭐⭐⭐⭐ |
| All-in-One Installation | Challenging | Long-term use | 30-40 minutes | ⭐⭐⭐⭐⭐ |
Top 7 Child Safety Seats: Expert Analysis
After extensive research and analysis, I’ve identified seven outstanding car seats that excel in safety, ease of installation, and overall value. Each product represents real options available today, carefully selected based on crash test results, customer reviews, and expert recommendations.
1. Graco 4Ever DLX
The Graco 4Ever DLX stands as our top overall recommendation for families seeking a comprehensive solution. This 4-in-1 convertible seat features TrueShield side impact technology and serves children from 4 to 120 pounds across ten years of use.
Key Specifications:
- Rear-facing: 4-40 pounds
- Forward-facing harness: 22-65 pounds
- Highback booster: 40-100 pounds
- Backless booster: 40-120 pounds
- Weight: 21.9 pounds
- Six-position recline
- 10-position headrest
✅ Impressive third-party crash test scores
✅ Easy-to-clean, machine-washable fabrics
✅ Simply Safe Adjust harness system
✅ Steel-reinforced frame construction
✅ InRight LATCH system for secure installation
❌ Heavier than some competitors
❌ Takes up significant rear seat space
2. Chicco NextFit Zip
The Chicco NextFit Zip earned Consumer Reports’ “Best” crash test safety rating and features innovative SuperCinch LATCH tightening for foolproof installation.
Key Specifications:
- Rear-facing: 5-40 pounds
- Forward-facing: 22-65 pounds
- Nine-position recline
- Weight: 26.5 pounds
- Nine harness positions
✅ Outstanding crash test performance
✅ ReclineSure leveling system
✅ Premium zip-off fabrics for easy cleaning
✅ Newborn positioning insert included
✅ LockSure belt-tightening system
❌ Higher price point
❌ Bulkier design
3. Chicco KeyFit 30
As America’s best-selling infant car seat, the Chicco KeyFit 30 combines exceptional safety with user-friendly installation features perfect for newborns.
Key Specifications:
- Rear-facing only: 4-30 pounds
- Height limit: 30 inches
- Base weight: 9.1 pounds
- Carrier weight: 9.6 pounds
- Spring-assisted leveling foot
✅ RideRight bubble level indicators
✅ Five-point harness with one-pull tightening
✅ Energy-absorbing foam for impact protection
✅ Compatible with numerous stroller brands
✅ Easy click-in base connection
❌ Limited to infants only
❌ Shorter height limit than competitors
4. Britax One4Life ClickTight
The Britax One4Life ClickTight revolutionizes installation with its patented ClickTight system that ensures correct installation every single time.
Key Specifications:
- Rear-facing: 5-50 pounds
- Forward-facing: 25-65 pounds
- Booster mode: 40-120 pounds
- 14-position harness height
- Anti-rebound bar included
✅ Foolproof ClickTight installation system
✅ SafeCell impact protection technology
✅ Integrated steel bars for strength
✅ 10-year usability span
✅ Impact-absorbing base
❌ Premium pricing
❌ Heavier construction at 28.5 pounds
5. Nuna Pipa RX
For parents seeking luxury and cutting-edge safety technology, the Nuna Pipa RX delivers with its rigid LATCH system and fire-retardant-free fabrics.
Key Specifications:
- Rear-facing: 4-32 pounds
- Height limit: 32 inches
- Weight: 8.3 pounds (carrier)
- Four recline positions
- Load leg and anti-rebound bar
✅ Top-tier crash test performance
✅ Dream drape extendable canopy
✅ Merino wool insert for temperature regulation
✅ European belt path for airplane use
✅ Clear angle indicators
❌ Highest price point category
❌ Infant-only limitation
6. Safety 1st Grand 2-in-1
Budget-conscious families appreciate the Safety 1st Grand 2-in-1, which delivers solid safety performance without breaking the bank.
Key Specifications:
- Forward-facing harness: 30-65 pounds
- Belt-positioning booster: 40-100 pounds
- Weight: 9.5 pounds
- Integrated cup holders
- Side impact protection
✅ Affordable price point
✅ Lightweight and portable
✅ QuickFit harness adjustment
✅ Machine-washable padding
✅ Compact storage capability
❌ No rear-facing option
❌ Basic padding comfort
7. Evenflo Tribute
The Evenflo Tribute proves that excellent safety doesn’t require a premium price tag, delivering impressive crash test results at an entry-level cost.
Key Specifications:
- Rear-facing: 5-40 pounds
- Forward-facing: 22-40 pounds
- Width: 18.5 inches
- Weight: 9 pounds
- Four harness positions
✅ Outstanding value proposition
✅ Narrow profile fits three-across
✅ Solid crash test performance
✅ Lightweight portability
✅ Easy to transfer between vehicles
❌ Basic features only
❌ Lower weight limits
❌ Minimal padding
Ready to Protect Your Little One? ✨
These carefully selected car seats represent the best options available today. Click on any product name above to check current availability and read detailed customer reviews. Your child’s safety is worth the investment, and these tested solutions provide peace of mind for every journey. Don’t wait—secure your child’s protection now!
Just one click – help others make better buying decisions too!
[addtoany]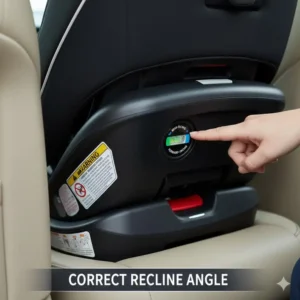
Understanding Child Safety Seat Installation Tips Fundamentals
Before we get into the nitty-gritty of child safety seat installation tips, let’s establish some foundational knowledge. The world of car seats isn’t as complicated as it seems once you break it down into manageable pieces.
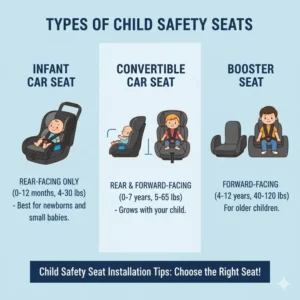
The Four Types of Car Seats
Understanding which type you need is the first step in mastering child safety seat installation tips:
Infant Seats (Rear-Facing Only)
These are specifically designed for newborns and babies up to about 30-35 pounds. They feature a carrier that detaches from a base, making it super convenient for transferring sleeping babies. The engineering behind infant seats addresses unique safety concerns like positional asphyxiation and provides narrower shoulder harness straps perfectly sized for tiny humans.
Convertible Seats
These versatile options start rear-facing for infants and convert to forward-facing for toddlers. Consequently, they eliminate the need for multiple seat purchases. Weight limits typically range from 5 pounds rear-facing up to 65 pounds forward-facing.
Combination Seats
Starting as forward-facing harness seats, these convert to belt-positioning boosters. They’re ideal for children who’ve outgrown their rear-facing seats but still need harness restraint.
Booster Seats
Designed for older children (typically 40-120 pounds), boosters position the vehicle’s seat belt correctly across a child’s body. They come in high-back and backless varieties.
Child Safety Seat Installation Tips: Step-by-Step Methods
Now we’re getting to the heart of child safety seat installation tips. I’m going to walk you through both major installation methods so you can choose what works best for your situation.
LATCH System Installation Method
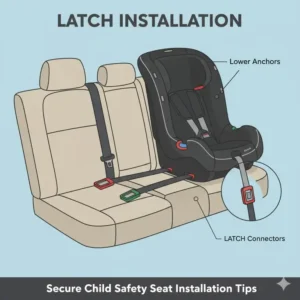
The LATCH system (Lower Anchors and Tethers for Children) was mandated in all vehicles manufactured after September 2002. This system provides standardized anchor points in your vehicle for securing car seats.
Step 1: Locate Your Vehicle’s Anchors
Run your hand along the crack between the seat back and seat bottom. You should feel small metal bars—these are your lower anchors. Most vehicles have them in the two outboard rear seating positions.
Step 2: Position the Seat
Place your car seat in the desired seating position. For rear-facing installations, aim for a 30-45 degree recline angle, which most seats indicate with built-in level indicators.
Step 3: Attach the LATCH Connectors
Hook the lower anchor connectors to your vehicle’s anchor bars. Some seats feature push-button connectors while others use hook-style attachments.
Step 4: Tighten the Straps
Press down firmly on the car seat with your body weight while pulling the adjustment strap tight. This is crucial for proper child safety seat installation tips execution.
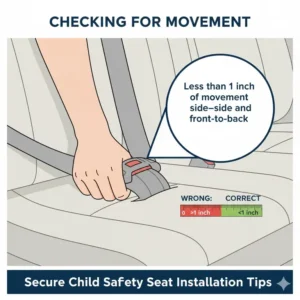
Step 5: Perform the Inch Test
Grab the seat at the belt path and try to move it side-to-side and front-to-back. Movement should be less than one inch in any direction.
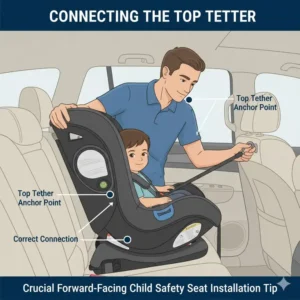
Step 6: Attach the Tether (Forward-Facing Only) ⛓️
For forward-facing installations, locate your vehicle’s tether anchor (usually behind the seat or on the ceiling) and attach the top tether strap, pulling it tight.
Seat Belt Installation: The Alternative Approach
While LATCH is popular, seat belt installation is equally safe when done correctly. In fact, once your child and seat together weigh more than 65 pounds, you must switch to seat belt installation anyway.
Detailed Seat Belt Installation Process
Understanding Your Seat Belt System
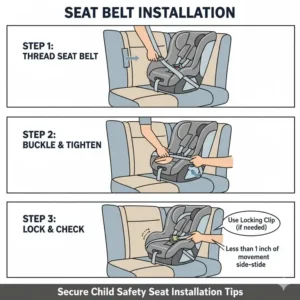
Not all seat belts are created equal. Your vehicle manual will explain whether your seat belt automatically locks or requires manual locking. Some older vehicles need locking clips—small metal devices that keep the belt from sliding.
Threading the Belt Path
Different seats have different belt paths for rear-facing versus forward-facing installations. Look for clearly marked routes (usually in blue for rear-facing and red for forward-facing).
Locking Your Seat Belt
This is where many parents struggle with child safety seat installation tips. For automatic locking retractors, pull the belt all the way out until you hear it click, then let it retract. The belt should now lock when you tug on it.
Achieving Proper Tightness
Here’s a pro tip I learned from a certified technician: put your knee on the seat while buckling the belt, then push down hard while pulling the slack out of the belt. This technique ensures the seat won’t budge.
Car Seat Installation Tips Comparison: LATCH vs Seat Belt
| Feature | LATCH System | Seat Belt Installation |
|---|---|---|
| Installation Speed | ⚡ 10-15 minutes | ⏱️ 15-20 minutes |
| Weight Limit | Up to 65 lbs combined | No upper limit |
| Vehicle Compatibility | 2002+ vehicles | All vehicles |
| Error Rate | Lower when used correctly | Slightly higher |
| Transferability | Quick release | Requires unbuckling |
| Center Seat Use | Limited availability | Always available |
Common Installation Mistakes and How to Avoid Them
After reviewing thousands of car seat checks, certified technicians report these recurring errors in child safety seat installation tips execution:
Mistake #1: Loose Installation
The Problem: Nearly 73% of inspected seats move more than one inch at the belt path.
The Fix: Use significant body weight when tightening. I’m talking about putting your knee on the seat and using your full strength to compress it while tightening the straps or belt.
Mistake #2: Incorrect Harness Height ⚠️
The Problem: Harness straps positioned at the wrong height compromise safety dramatically.
The Fix: For rear-facing, straps should be at or below shoulder level. For forward-facing, straps should be at or above shoulder level. Check this every few months as your child grows.
Mistake #3: Twisted Straps
The Problem: Twisted harness straps can reduce effectiveness by up to 70% in a crash.
The Fix: Before every trip, run your hand along each strap from the buckle to the shoulder, smoothing out any twists.
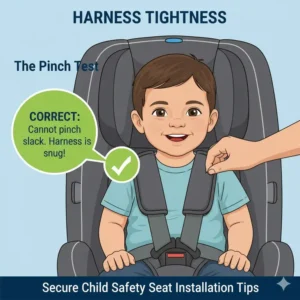
Mistake #4: Loose Harness
The Problem: If you can pinch the harness strap at your child’s shoulder, it’s too loose.
The Fix: After buckling, pull the adjustment strap until you cannot pinch any fabric at the shoulder. Bulky coats defeat proper harness fit—buckle your child first, then place blankets over the harness.
Mistake #5: Wrong Recline Angle
The Problem: Incorrect recline can obstruct airways in infants or reduce crash protection.
The Fix: Follow your seat’s recline indicators precisely. Most infant seats need a 30-45 degree angle, which changes as the baby grows.
Safety Seat Installation Tips: Advanced Considerations
Understanding Weight Limits and Transitions
Here’s something many parents don’t realize about child safety seat installation tips: just because your child reaches a certain age doesn’t mean they’re ready to transition to the next seat type.
| Age Group | Recommended Position | Why It Matters |
|---|---|---|
| Newborn-2+ years | Rear-facing | Protects head, neck, and spine by distributing crash forces |
| 2-5+ years | Forward-facing harness | Five-point harness provides full-body restraint |
| 5-8+ years | High-back booster | Positions seat belt correctly |
| 8-12 years | Belt-positioning booster | Ensures proper belt fit until adult size |
Vehicle-Specific Installation Considerations
Sedans and Coupes
Smaller back seats may require careful seat selection. Look for narrower profiles (under 17 inches wide) if you need to fit three across.
SUVs and Minivans
Larger vehicles offer more flexibility but may have sloped seat backs that affect installation angles. Some seats work better than others in these vehicles.
Pickup Trucks
Never install a car seat in front of an active airbag. Many trucks lack rear seats, so you must disable the passenger airbag if that’s your only option (and consult your vehicle manual).
Child Car Seat Installation Tips: Seasonal Adjustments
Winter Installation Challenges ❄️
Cold weather brings unique challenges to child safety seat installation tips implementation. Puffy winter coats create dangerous slack in harness systems.
The Solution:
- Buckle your child in their regular clothes
- Perform the pinch test to ensure snugness
- Place coats backward over the harness
- Use car seat ponchos designed for this purpose
Summer Heat Considerations ☀️
Buckle Temperature:
Metal buckles can reach 156°F in direct sunlight. Cover the seat when parked or use a light cloth over metal parts.
Harness Adjustment:
Children wearing less clothing may need harness tightening adjustments.
Comparison: Installation Ease Across Seat Types
| Seat Type | Installation Complexity | Time Investment | Learning Curve |
|---|---|---|---|
| Infant Seat with Base | ⭐⭐ Easy | Initial: 30 min, Daily: 5 sec | Low |
| Convertible (Rear-Facing) | ⭐⭐⭐ Moderate | 20-30 minutes | Medium |
| Convertible (Forward-Facing) | ⭐⭐⭐ Moderate | 25-35 minutes | Medium |
| All-in-One | ⭐⭐⭐⭐ Complex | 40-50 minutes | High |
| Booster Seat | ⭐ Very Easy | 2-5 minutes | Very Low |
Professional Help: When and Where to Get It
Even armed with comprehensive child safety seat installation tips, sometimes you need expert eyes on your installation. The National Highway Traffic Safety Administration sponsors free car seat inspection events nationwide.
Finding Certified Technicians
Visit the NHTSA website and use their inspection station locator by entering your zip code. You’ll find:
- Fire stations offering free checks
- Police departments with trained personnel
- Hospitals with child passenger safety programs
- Community events on National Seat Check Saturday (September 27, 2025)
What to Expect at an Inspection ✅
Certified Child Passenger Safety Technicians will:
- Verify you have the correct seat for your child’s size
- Check installation tightness and angle
- Ensure harness positioning is correct
- Demonstrate proper buckling techniques
- Provide written documentation
Product Features Comparison: Making the Right Choice
| Feature | Graco 4Ever DLX | Chicco NextFit Zip | Britax One4Life | Nuna Pipa RX | Evenflo Tribute |
|---|---|---|---|---|---|
| Years of Use | 10 years | 8+ years | 10 years | 1-2 years | 5-6 years |
| Installation System | InRight LATCH | SuperCinch LATCH | ClickTight | Rigid LATCH | Standard hooks |
| Side Impact Protection | ✅ Yes | ✅ Yes | ✅ Yes | ✅ Yes | ⚠️ Basic |
| Recline Positions | 6 | 9 | Multiple | 4 | 2 |
| Machine Washable | ✅ Yes | ✅ Zip-off | ✅ Yes | ⚠️ Spot clean | ✅ Yes |
| Anti-Rebound Bar | ❌ No | ❌ No | ✅ Yes | ✅ Yes | ❌ No |
| Overall Value | ⭐⭐⭐⭐⭐ | ⭐⭐⭐⭐ | ⭐⭐⭐⭐ | ⭐⭐⭐ | ⭐⭐⭐⭐⭐ |
Maintenance and Long-Term Car Seat Safety
Proper child safety seat installation tips extend beyond initial setup. Regular maintenance ensures continued protection.
Registration and Recalls
Within one week of purchase, register your car seat with the manufacturer. This ensures you receive immediate notification of any safety recalls. According to NHTSA data, millions of seats have been recalled over the past decade, but only 25% of owners actually register their seats.
Expiration Dates Matter ⏰
Car seats expire after 6-10 years depending on the manufacturer. Why? Plastic degrades over time due to:
- Temperature fluctuations
- UV radiation exposure
- Normal wear and tear
- Material breakdown
Check the expiration date stamped on your seat and never use an expired seat.
After a Crash: Replacement Guidelines
The NHTSA states that car seats must be replaced after a moderate or severe crash. A crash is considered minor only if ALL of these conditions are met:
- The vehicle can be driven away from the crash site
- The vehicle door nearest the car seat was not damaged
- No one in the vehicle was injured
- The airbags did not deploy
- There is no visible damage to the car seat
When in doubt, replace it. Many insurance policies cover car seat replacement after crashes.
Benefits Quantification: Why Proper Installation Matters
| Safety Benefit | Statistical Impact | Real-World Translation |
|---|---|---|
| Injury Reduction | 82% decrease | 8 out of 10 injuries prevented |
| Fatal Injury Prevention | 71% reduction | 7 lives saved per 10 fatal crashes |
| Proper Rear-Facing | 5x safer | 500% better protection for infants |
| Correct Harness Fit | 70% more effective | 7 out of 10 improved outcomes |
| Tether Use (Forward) | 23% force reduction | Nearly 1/4 less crash force |
These aren’t just numbers from government websites like the NHTSA—they represent real children’s lives saved through proper application of child safety seat installation tips.
Installation Time Investment Comparison
| Installation Task | First-Time Duration | Experienced User | Frequency Needed |
|---|---|---|---|
| Initial Base Installation | 30-45 minutes | 15-20 minutes | Once per vehicle |
| Carrier Attachment | 5-10 minutes | 5 seconds | Every trip |
| Convertible Installation | 40-60 minutes | 20-30 minutes | Once or with growth |
| Harness Adjustment | 10-15 minutes | 5-10 minutes | Monthly or as needed |
| Belt Path Change | 15-20 minutes | 10-15 minutes | Once during transition |
| Professional Inspection | 30-45 minutes | 30-45 minutes | Annually recommended |
Special Situations: Adapting Installation Techniques
Installing in Rental Cars
When traveling, you’ll need to master child safety seat installation tips quickly in unfamiliar vehicles:
- Always carry your seat’s instruction manual
- Request the vehicle’s owner manual at the rental counter
- Allow extra time for installation (30-45 minutes)
- Consider seats designed for travel (lightweight, quick-install)
Three-Across Installation
Installing three car seats across a back seat requires strategic planning:
- Measure your back seat width (most are 50-55 inches)
- Look for narrow-profile seats (under 17 inches wide)
- Install the center seat first (safest position)
- Consider combination convertible + booster arrangements
Taxis and Ride-Shares
In many jurisdictions, taxis are exempt from car seat laws. However, that doesn’t make it safe. Always travel with a portable car seat or consider using ride-share services that provide car seats (though confirm proper installation).
Troubleshooting Common Installation Problems
Problem: Seat Won’t Sit Flat ️
Causes: Sloped vehicle seat, thick seat cushion, seat belt buckle interference
Solutions:
- Use pool noodle or rolled towel under front edge (check manual)
- Try different seating positions in vehicle
- Consider seats designed for sloped seats
Problem: Can’t Get Tight Installation
Causes: Insufficient pressure during tightening, belt not locked, wrong belt path
Solutions:
- Put knee on seat, push down hard while tightening
- Verify belt locking mechanism is engaged
- Double-check belt path against manual diagrams
Problem: Recline Angle Indicator Shows Red
Causes: Vehicle seat angle, improper positioning
Solutions:
- Adjust vehicle seat position if possible
- Use recline adjustment features on car seat
- Add rolled towel under front of base (if manual allows)
Problem: LATCH Connectors Won’t Click ⚠️
Causes: Connectors not fully inserted, anchor bar obstruction, wrong anchor points
Solutions:
- Feel for metal bar by hand first
- Push connectors firmly until click is heard and felt
- Try flexing connector while pushing
Cost Analysis: Investment in Safety
| Seat Category | Budget Range | Mid-Range | Premium | Total 0-10 Year Cost |
|---|---|---|---|---|
| Infant Only | $80-$150 | $150-$250 | $250-$550 | + additional seats |
| Convertible | $100-$180 | $180-$320 | $320-$500 | + booster later |
| All-in-One | $150-$250 | $250-$400 | $400-$600 | One-time purchase |
| Booster Only | $40-$80 | $80-$150 | $150-$300 | Last seat needed |
The All-in-One Value Proposition:
While an all-in-one seat like the Graco 4Ever DLX costs more initially, it eliminates the need for multiple seat purchases. A typical journey might include:
- Infant seat: $200
- Convertible: $250
- Booster: $100
- Total: $550 vs. one all-in-one at $300-400
Real Parent Experiences: Learning from Others
Throughout my research on child safety seat installation tips, I’ve encountered countless parent stories. One stands out: Sarah, a first-time mom, spent hours installing her infant seat, only to have a technician show her it was incorrectly positioned. Her baby had been riding unsafely for two weeks.
Another parent, Mike, assumed his three-year-old was ready for forward-facing because of his age. However, his child hadn’t reached the rear-facing weight limit. When he learned that rear-facing is five times safer, he immediately repositioned the seat.
These stories underscore why proper child safety seat installation tips aren’t just guidelines—they’re critical life-saving knowledge.
The Science Behind Car Seat Safety
Understanding why these child safety seat installation tips matter helps motivate proper implementation:
Crash Force Distribution
When a vehicle stops suddenly, everything inside continues moving at the original speed. A 25-pound child in a 30 mph crash experiences 750 pounds of force. Proper installation distributes these forces across the strongest parts of a child’s body.
Rear-Facing Physics
In rear-facing seats, crash forces spread across the entire back surface of the seat, which then distributes energy across the child’s stronger back and torso rather than concentrating it on the fragile neck and spine.
Five-Point Harness Engineering ️
The five-point harness system (two shoulder straps, two hip straps, one crotch strap) creates five load paths to distribute crash forces. Proper tightening ensures these straps work as designed.
Quick Reference Installation Checklist
Use this checklist every time you install a car seat to ensure you’re following proper child safety seat installation tips:
Pre-Installation ✓
- ✅ Read both seat and vehicle manuals
- ✅ Choose appropriate seat for child’s age/weight
- ✅ Select safest seating position (center rear if possible)
- ✅ Check seat expiration date
- ✅ Verify vehicle anchor compatibility
During Installation ✓
- ✅ Route belt or LATCH through correct path
- ✅ Apply significant body weight during tightening
- ✅ Achieve less than 1-inch movement at belt path
- ✅ Verify recline angle indicator shows green/correct
- ✅ Attach and tighten top tether (forward-facing)
Harness Adjustment ✓
- ✅ Straps at or below shoulders (rear-facing)
- ✅ Straps at or above shoulders (forward-facing)
- ✅ Chest clip at armpit level
- ✅ Cannot pinch harness strap at shoulder
- ✅ No twisted straps anywhere
Final Verification ✓
- ✅ Perform inch test at belt path
- ✅ Check all buckles and connectors
- ✅ Verify nothing trapped under seat
- ✅ Test harness tightness
- ✅ Confirm child’s position and comfort
Regional and State-Specific Requirements
While federal regulations provide baseline standards, individual states have varying child safety seat installation tips requirements:
Extended Rear-Facing Laws
States like California, Connecticut, and Pennsylvania now require rear-facing until age 2. However, safety experts recommend rear-facing until children outgrow the seat’s limits (often 40-50 pounds).
Booster Seat Age Requirements
Requirements vary from age 6 to 8 years old, but physical size matters more than age. Children should use boosters until the vehicle seat belt fits properly (typically 4’9″ tall).
Penalty Variations ⚖️
First-time violations range from warnings to $500 fines depending on jurisdiction. More importantly, improper installation during a crash could result in tragedy.
Future of Car Seat Technology
The evolution of child safety seat installation tips continues with innovative developments:
Integrated Car Seats
Some luxury vehicles now offer built-in car seats that fold out from the seat back. These eliminate installation errors but limit vehicle flexibility.
Smart Sensors
Emerging technology includes:
- Bluetooth-connected sensors monitoring installation tightness
- Apps providing installation guidance
- Alert systems for harness looseness
- Temperature warnings for hot vehicles
Improved Materials
Research into impact-absorbing foam, stronger plastics, and energy-dissipating materials promises even better protection in future seat generations.
Make Safety Your Priority Today!
Don’t leave your child’s safety to chance. The child safety seat installation tips we’ve covered give you the foundation, but getting professional verification provides ultimate peace of mind. Schedule a free inspection appointment this week—it takes just 30 minutes and could save your child’s life. Find a certified technician near you now! ️
Conclusion
We’ve covered extensive ground in understanding child safety seat installation tips, from basic concepts to advanced techniques. Remember, the statistics are clear: proper installation reduces injury risk by 82%. That’s not just a number—it’s your child’s wellbeing.
The journey of parenthood brings countless decisions, but few are as critically important as car seat safety. Whether you choose the versatile Graco 4Ever DLX, the crash-test champion Chicco NextFit Zip, or the budget-friendly Evenflo Tribute, what matters most is correct installation and use.
I encourage you to take three actions today:
First, check your current car seat installation against the guidelines we’ve discussed. Second, schedule a free inspection with a certified technician. Third, share these child safety seat installation tips with other parents in your community.
Your diligence in applying these child safety seat installation tips could literally save a life—perhaps your own child’s. Every journey begins with proper preparation, and every safe trip starts with a correctly installed car seat.
FAQs
❓ How tight should a child safety seat installation be?
✅ A properly installed child safety seat should move less than 1 inch side-to-side or front-to-back when pulled firmly at the belt path. This tightness ensures the seat remains securely in place during sudden stops or crashes. To achieve this, push down hard on the seat with your knee while tightening the LATCH straps or seat belt. Professional technicians recommend using significant body weight during installation...
❓ Can you install car seats without LATCH system?
✅ Yes, seat belt installation is equally safe and sometimes required. All car seats can be installed using vehicle seat belts following manufacturer instructions. In fact, once your child and seat together weigh more than 65 pounds, you must switch to seat belt installation as LATCH systems have weight limits. Seat belts work in every vehicle regardless of age, making them universally accessible...
❓ When should you get car seat installation checked professionally?
✅ Schedule professional inspection before baby arrives, after any crash (even minor), when changing seat types, annually for verification, or whenever you feel uncertain about installation correctness. Certified Child Passenger Safety Technicians offer free inspections at fire stations, police departments, and community events nationwide. The National Highway Traffic Safety Administration reports 46% of seats are misused...
❓ What car seat position is safest in backseat?
✅ The center rear seat is statistically the safest position if your car seat fits properly there with LATCH or seat belt. This position provides maximum distance from side-impact collisions on both sides. However, if the center seat lacks proper installation points or prevents secure installation, the outboard positions (behind driver or passenger) are excellent alternatives...
❓ How often should harness straps be adjusted on car seats?
✅ Check harness strap position monthly or whenever your child's clothing thickness changes seasonally. For rear-facing seats, straps should remain at or below shoulder height, while forward-facing seats need straps at or above shoulders. Children grow rapidly during first years, requiring frequent adjustments. Additionally, perform the pinch test before every trip...
Recommended for You
- Non Slip Tub Decals for Infants: 7 Best Safety Options 2025
- Furniture Corner Guards Adhesive Type: 7 Top Picks 2025 for Maximum Child Safety
- Best Outlet Covers That Don’t Pop Out: 7 Top-Rated Picks for Maximum Child Safety [2025]
Disclaimer: This article contains affiliate links. If you purchase products through these links, we may earn a small commission at no additional cost to you.
✨ Found this helpful? Share it with your friends!
[addtoany]